Performance is crucial for websites because nobody likes slow web pages. From user experience to search engine rankings, it directly affects everything. A fast loading site can help you generate a potential lead, on the other hand, a slow webpage can easily turn away potential customers.
The web is all about user experience. If a user has to wait too long for a web page to load, chances are he might close the page even before it loads and never come back. No matter how good your content or product is. If you fail to show that you care about your customers on your webpage, you can’t win their trust.
Talking about the performance, the biggest chunk of the web pages consist of media (images/videos). Optimization of media assets can lead to a huge performance boost. But it is also important to not lose media quality during this process because they are the main source of leads as well. That’s why due care should be taken in the process to achieve an optimal level of media optimization.
Like anything on the web, there are tons and tons of ways to optimize images and videos. I have tried a number of WordPress plugins and third-party solutions to optimize media. Each solution has its benefits and limitations. It could be frustrating to find a way a solution that works for you.
🌟 Cloudinary is one of such solutions that I discovered a few years ago and it stands out among all for me. Ever since I have started using it, I have never had to look back. I have integrated it into multiple projects and I couldn’t be more satisfied. Cloudinary is a one-stop-shop for all my media serving, uploading, and optimizing problems.
Cloudinary also used to have an old WordPress plugin but they recently updated it and launched the version 2. This new version is a game changer. WordPress & Cloudinary are now very well integrated. Today, I am going to talk about this plugin. In particular, I will be talking about how you can get started with it and how it can help you improve your web performance.
So, let’s jump in!
🚀 Cloudinary
Founded in 2011, Cloudinary is an industry leader in cloud-based image and video management solutions. It allows users to upload, store, manage, manipulate, and deliver images/videos on almost all platforms. They started out of Israel and managed to grow big during this short span. In 2015, they opened their headquarters in Palo Alto and in 2019, the company moved to Santa Clara, California.
🔥
During this time, they also managed to grow a huge customer base. They currently serve over 550,000 customers by managing over 25B media assets on their platform. Their customer includes big names like Forbes, Under Armour, NBC, Virgin, Fiverr, Buzz Feed, TED, Uber, and more.
According to Inc. Magazine, Cloudinary is the gold standard of managing media. Over the years they have grown their solutions and keep adding new items to the list. They have plugins and extensions for different platforms for easy integration. They also rock a great API to serve the media. And everything is extensively documented — making it super easy to get started.
With all that said, let’s take a look at its WordPress plugin and see how it actually works!
💯 Getting Started
Cloudinary WordPress plugin allows you to upload, migrate, manage, import, and serve images and videoes using its WordPress plugin. It supports both classic and Gutenberg editors. Apart from that, it also supports individual, taxonomy, and global level transformation. Which comes quite handy if you want to conditionally transform your media.
Now, before we get started, I am going to create a post with a couple of images. We will perform a test on it to see how it performs. Then, we will configure Cloudinary and see what difference it makes. Later on, we will take a detailed look at its configuration and what you can achieve with it.
😟 Page Speed Before Cloudinary
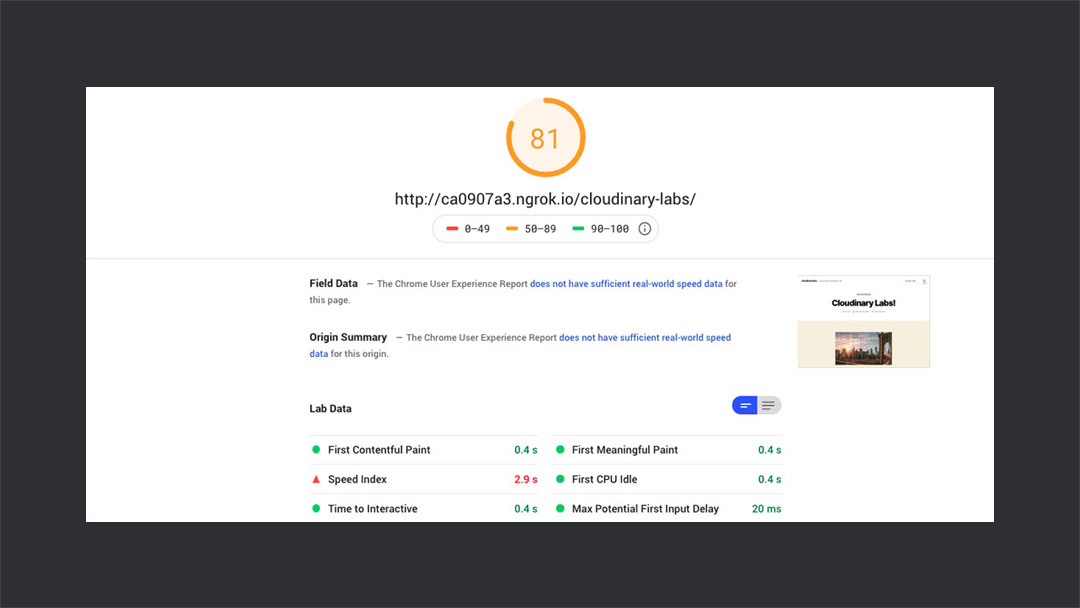
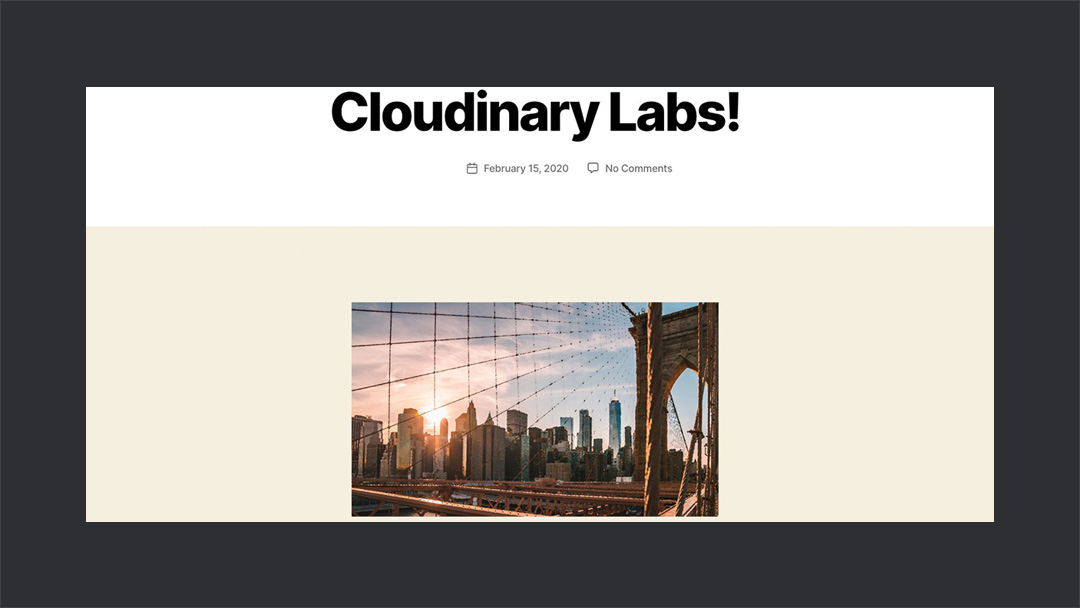
I have created a post with a couple of stock images of New York City from Unsplash. I ran a page speed test and below are the results. Bear in mind that I am running a fresh installation of WordPress with the default 2020 theme and without any optimization. Also, it is being served on the web through a local server.
The score is 81 — not too bad but still, it’s a fresh installation with no other content/load. The scenario could be quite different for a production site. Now, let’s jump on to setting up Cloudinary on our WordPress installation and see how it goes.
⚙️ Installation & Configuration
Installing and configuring the Cloudinary WordPress plugin is quite simple and straight forward. If you have ever installed a plugin before, you should be fine. However, in any case, follow the quick steps below to install and configure the plugin.
→ Step #0
The very first step is to download and activate the Cloudinary WordPress plugin from your WordPress admin panel. Or you can download the plugin zip file and follow along.
→ Step #1
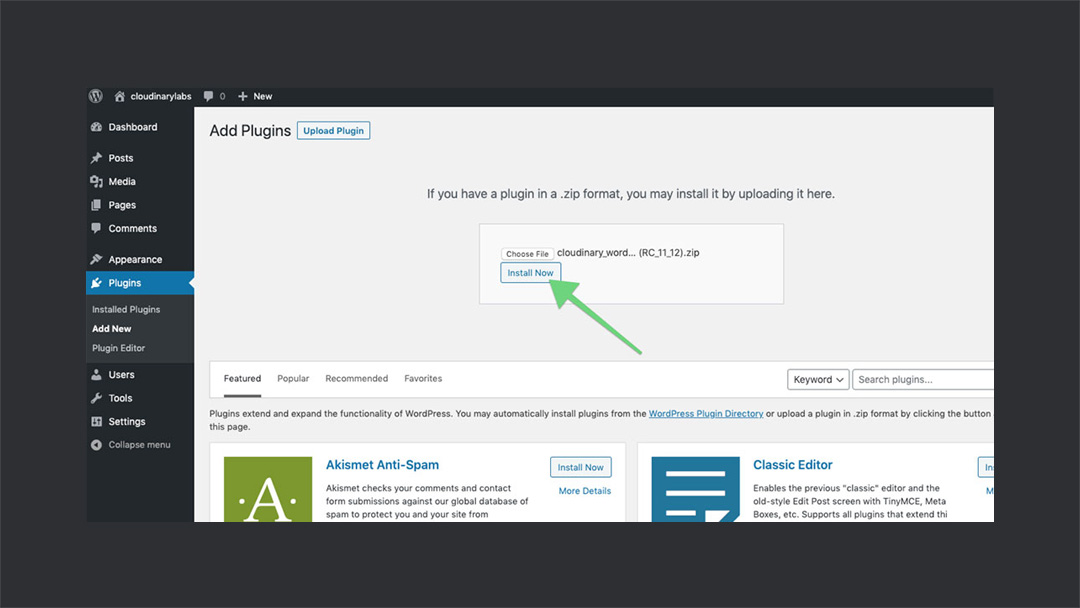
Once you have downloaded the plugin, go to the WordPress admin dashboard and navigate to Plugins > Add New. Click on Add New button on the top, then click on Choose File and select the .zip file that you have downloaded before. After that hit the Install Now button and activate it after installation.
→ Step #2
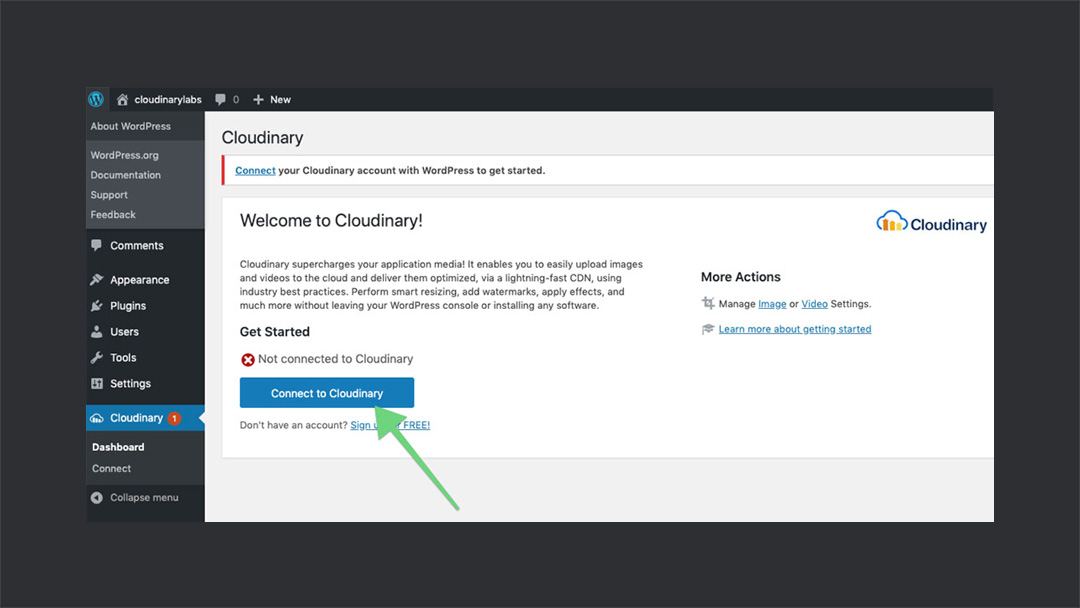
Once you have installed it, you will see a new item in the sidebar named Cloudinary. It will probably have a red dot with 1 written on it, indicating 1 task needs attention. You need to link it to your Cloudinary account before you start using it.
Click on it and it will take you to the plugin dashboard. It will show you a button saying [Connect to Cloudinary]. I have also shown this in the screenshot below.
In case if you have not already created a Cloudinary account, go create one. You can signup for free on Cloudinary.
→ Step #3
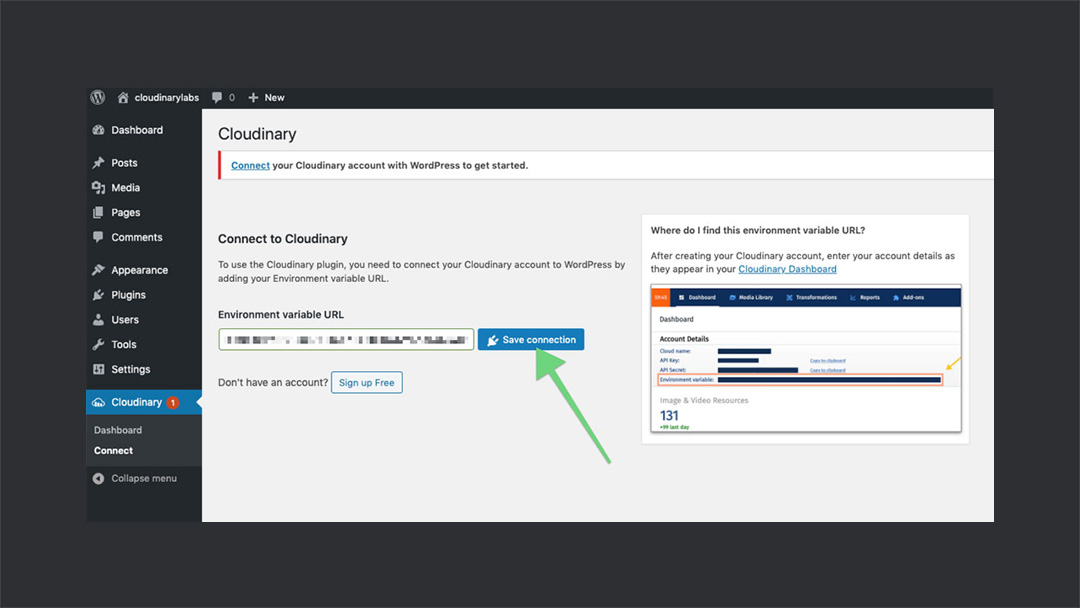
Once you click on the button, it takes you the Connect tab of the Cloudinary Plugin. Now it requires an environment variable URL. You can find the URL in your Cloudinary dashboard. It will look something like below. You can directly copy the URL from your Cloudinary dashboard. Take a look at the image below to see how:
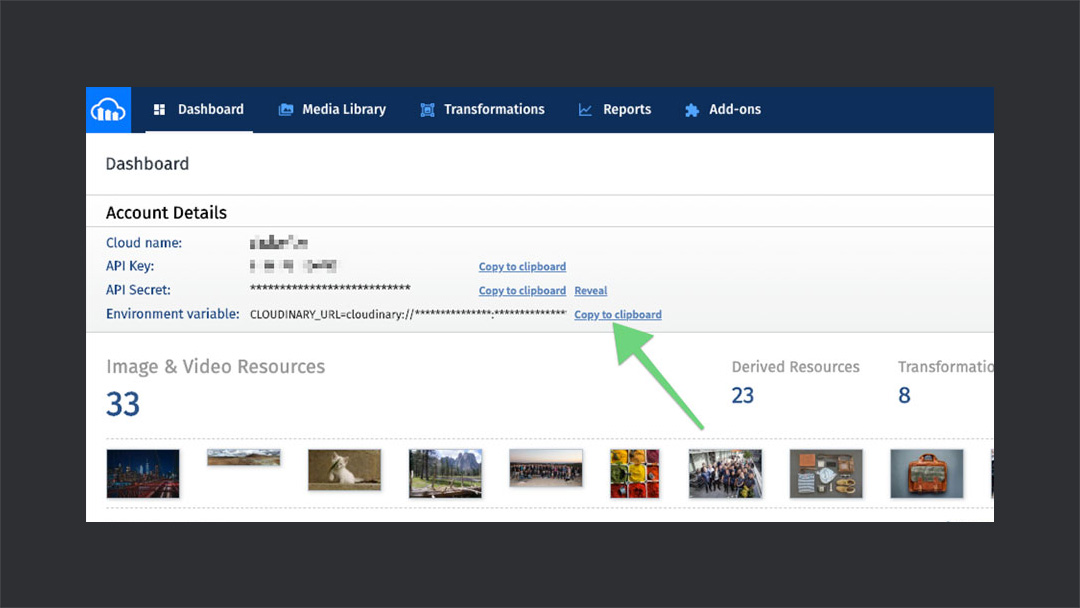
So only paste that in part in the input section and hit Save Connection button. It will check the validity of the URL, if correct, it will automatically connect your account.
Once it has successfully connected your account, it will give you a success message saying [✅ Connected to Cloudinary]. Now you will be able to see and access two more tabs in the Cloudinary menu, namely Global Transformations and Sync Media. That’s where you can configure things in detail.
That’s all you need to get up running with Cloudinary on WordPress. Note that Cloudinary has been connected with your WordPress site using the default configurations. In the default configuration, all of your new media gets synced automatically and served in auto optimized quality.
Now, upload any media on your site and take a look at its source. You will find that it will be served from Cloudinary. It’s because Cloudinary has transformed your media and now serving the optimized version automatically. Now, without diving any further into the configuration let’s take a look at the page speed.
😃 Page Speed After Cloudinary
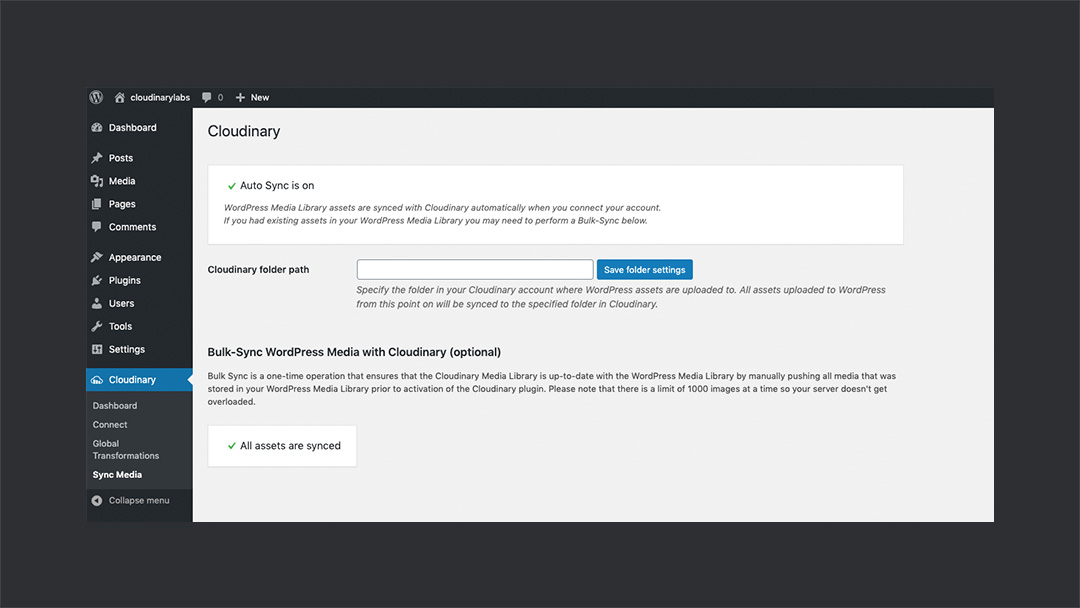
We have the Cloudinary plugin up and running with the default configuration. But since we had uploaded the media files before activating the plugin, it will not be automatically synced to our Cloudinary cloud instance. First, we need to sync it manually.
To sync the media, go to the admin dashboard and navigate to Cloudinary > Sync Media and click on the Sync All Media to Cloudinary button. It will take a while and all the assets will be optimized and synced to our Cloudinary cloud. Now, it will serve our assets from Cloudinary.
To check this, let’s open our previous post again and take it through the page speed test. Below are the results we get by merely turning on the plugin.
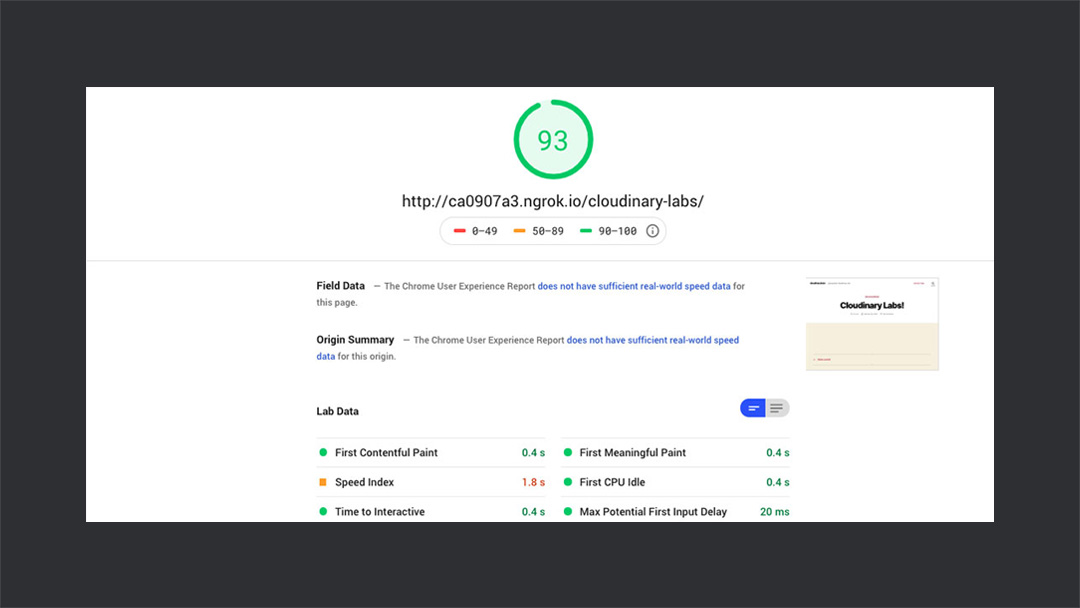
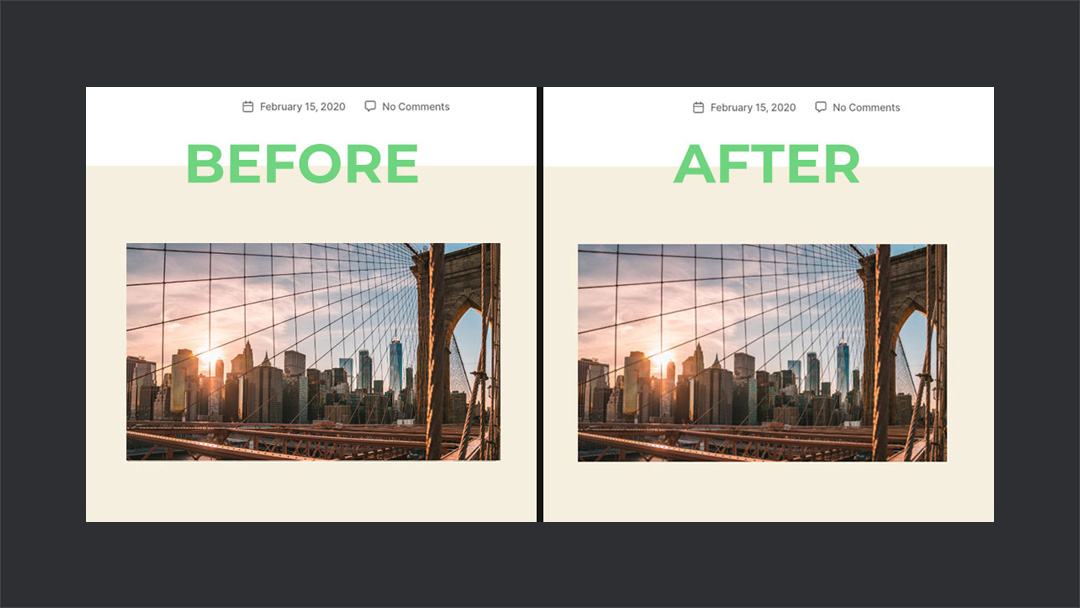
The best part is, we have not yet touched any configurations yet while the change in the speed is significant. Even if you take a look at the images by placing them side by side you will be hardly open to spot the difference. That’s what I love about Cloudinary. It optimizes your images without compromising the quality. 💯
I have placed both images side by side for you. Take a look at it below. Looks pretty dope, right!? Now, let’s jump on the configuration details of the plugin.
🌈 Image Transformations
Cloudinary WordPress Plugin offers mainly two things, Image Transformation, and Video Transformation. I will be touching Image Transformations in detail and Video Transformation is quite similar to it.
In order to access Image Transformations, go to Cloudinary > Global Transformations. The transformation settings for Images and Videos both can be accessed from here. By default, it’s on the Image Settings page.
🍭 Global Transformations
Before going to the Global Transformations settings, it’s necessary to understand that Cloudinary offers three levels of transformations.
- Global Level Transformations: Applied to all the assets automatically.
- Taxonomy Level Transformations: Applied based on the taxonomy (tag/category).
- Individual Level Transformations: Applied to individual assets.
You can overwrite/combine the transformations at any level. They have the following priority:
Individual ❯ Taxonomy ❯ Global
It translates to the following results:
- If you overwrite at the individual level, both taxonomy and global get ignored.
- If you overwrite at the taxonomy level, only the global level gets ignored.
- If you overwrite at both taxonomy and individual level, the result is the same as 1.
- If you don’t overwrite, all the transformations are combined according to their priority.
We will see in a while how to overwrite at each level.
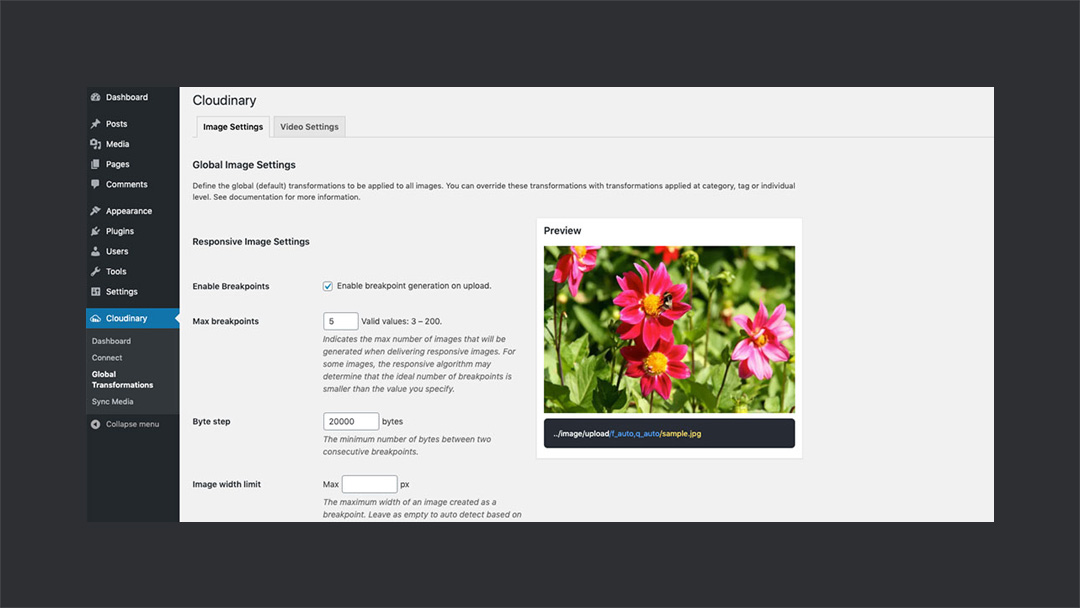
📏 Breakpoints
Breakpoints allow you to generate n number of images based on your number of breakpoints (n). It allows you to serve a different image based on the screen size of the device. For this, you have to specify the following settings:
- Max Breakpoints: The number n — total number of images you want to generate.
- Byte Step: The minimum size difference you want b/w two consecutive images. Cloudinary will optimize the images accordingly.
- Image Width: The maximum and minimum width of the image that you want in px.
Cloudinary automatically generates those images for you. Thereby providing you an effective way to reduce page size on different screen sizes.
📑 Image Format
The next option in Image Settings is Image Format. It is pretty self-explanatory. If you want to deliver all the images in a specific format, you can set it here. I recommend that you set it to auto so that a user gets served the best possible format for the browser they are using to browse your website wit. All the images will be delivered in that particular format.
- PNG
- GIF
- JPG
- WebP
🔥 Image Quality
In this section, you can actually control the quality of the images being served on your WordPress website. I personally prefer the default option — auto. Depending upon the type of images you are serving and your requirements, you can set the appropriate option from here. This option has a significant effect on the size of the image.
There are various options available in this section. You can refer to the official documentation here for the detail on each option.
👨💻 Image Transformation String
This is the place where all the transformation magic happens. Now, before proceeding to this section, let’s take a look at the URL of our images being served via Cloudinary. It looks something like this:
https://res.cloudinary.com/demo/image/upload/q_auto,f_auto/horse.jpg
Did you notice the section of the URL containing </span><b>f_auto,q_auto</b><span style="font-weight: 400;"> part? That’s an interesting thing about Cloudinary. You can pass a set of parameters in the URL and it will transform the image for you automatically. That’s what happens when you change settings of transformation.
Here f_auto means automatically fetch format and q_auto means automatically set the quality for the image. In a similar fashion, you can set more arguments and transform your images. There is a lot you can do here with Cloudinary. Take a look at the official documentation of Cloudinary to get an idea of the transformations.
For example, for the following image, I have added the parameter e_oil_paint:40.This is how it looks now.
📹 Video Transformations
If you click on the Video Settings tab under the Global Transformations section of Cloudinary. You will be taken to the Video Settings page. Here, you can configure everything just like we did for the images before.
- Video Player: So you can either use the Cloudinary video player or the default WordPress video player. In case if you go with the Cloudinary video player, it comes with a few more options described below.
- Player Options: With the Cloudinary video player options you can show controls, enable autoplay, and turn on the repeat option.
- Bitrate: Bitrate option allows you to manually manage the bitrate of your videos. By default, they are delivered in maximum possible bitrate.
- Video Transformation String: Similar to images, you can also perform transformations on the videos and it’s also pretty straight forward. Head to the transformations documentation for the videos and feel free to experiment.
♾ Sync Media
You would probably have a pretty good idea of what Sync Media does. We have already tested it before. It allows you to sync your WordPress media library with your Cloudinary cloud.
If you have any assets in your WordPress installation prior to the activation of the Cloudinary plugin, you can use this option to sync the media.
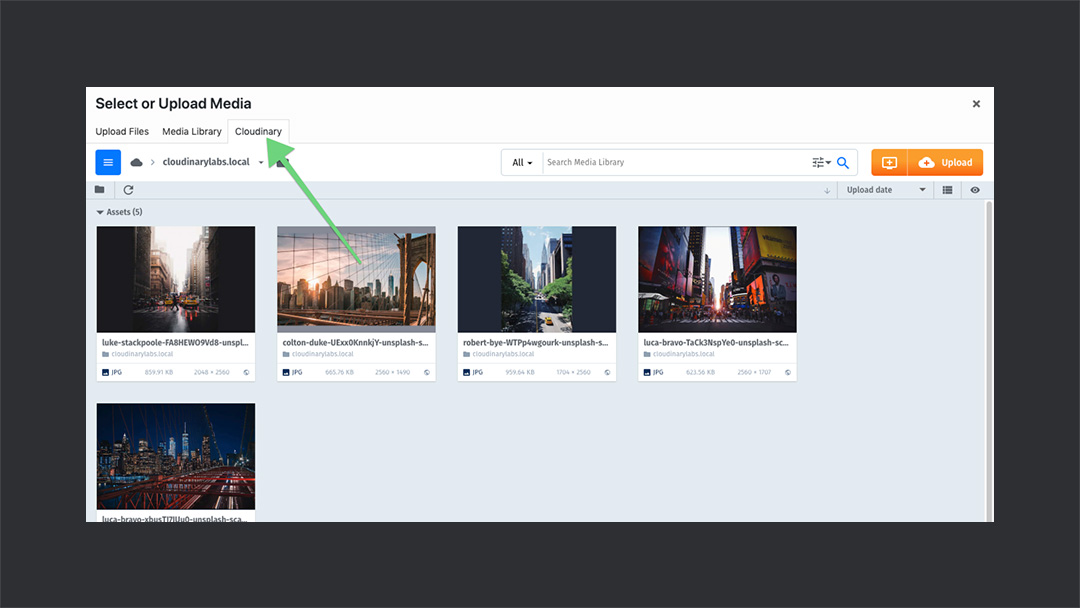
🖼 Cloudinary Media Library
Once you have a Cloudinary plugin up and running, you will have access to the Cloudinary media library when you add new media. It allows you to manage the media on your Cloudinary cloud. You can transform the images using this UI and import it into the WordPress media library. You actually perform the individual level transformations using the Cloudinary UI.
To access the Cloudinary media library, create a new post, and click on the Image icon. Click on Media Library option and a pop up will appear before you. On the top, along with Upload Files and Media Library options, you will see a tab named as Cloudinary. This is where you access your Cloudinary cloud form WordPress. 💯
🏷 Taxonomy Level Transformation
Taxonomy level transformation allows you to set transformation based on Tag or Category. Setting this transformation is also pretty straight forward. In order to set the transformation, go to Categories or Tags section under Posts in WordPress. Let’s go to Categories.
Under the Add New Category heading, where it asks you for the name and slug, now it will also ask you for the transformation string of images/videos. As I explained above, you can use the documentation of Cloudinary to generate a transformation string for your assets. The best part is, you can also preview the transformations as you change the transformation string. Pretty simple, right!?
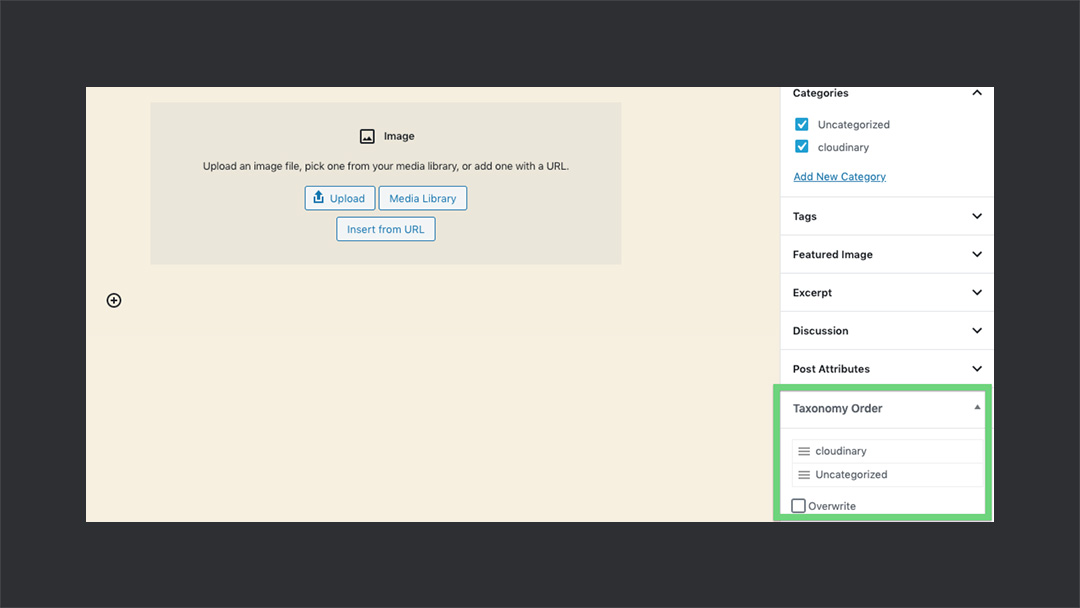
This is how you can add transformations to your media based on the taxonomy. Let’s see how it comes into the picture while creating a new post and how we can overwrite it. I have created a category named cloudinary and created a new post under it.
Now while creating the post, at the bottom right corner you will see options for Taxonomy Order. Here you can set the order of taxonomy. In case you want it to overwrite the global transformations, you can check the Overwrite checkbox.
🐶 Individual Level Transformation
The individual-level transformation has the highest priority. You can achieve individual level transformation using the Cloudinary media UI that I have shown you before.
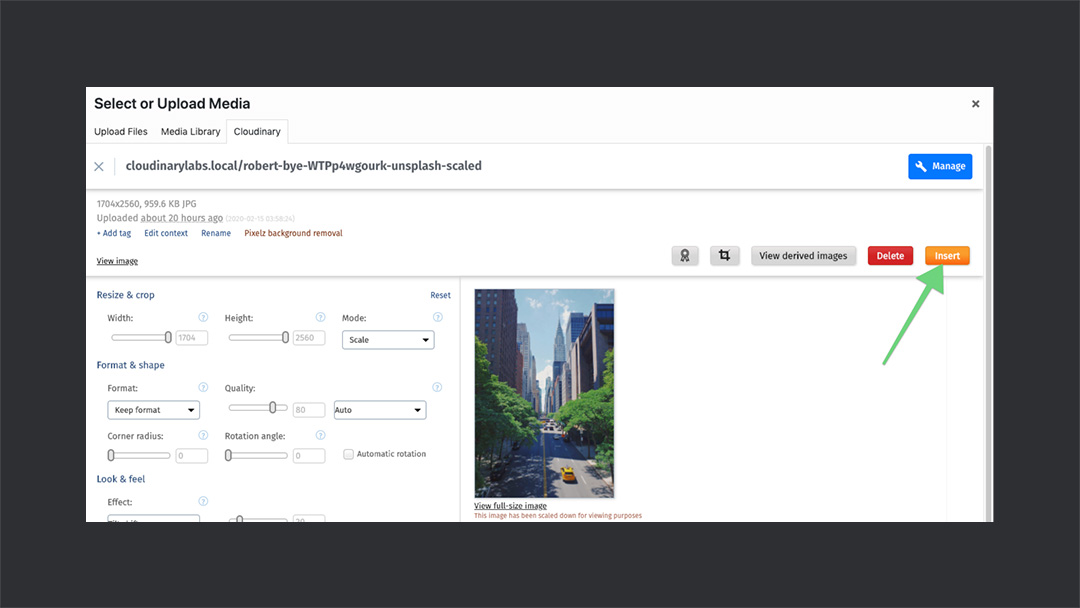
In order to do the transformation, go to the Cloudinary media UI and click on the Edit icon on any image. It will take you to the transformation interface. Here, you can make changes to your images using the UI. You can preview the changes while you make them.
Once done, you can click on the Insert button on top right corner. It will import the transformed image into your WordPress library with all the transformations in the URL. You can select it and start using it!
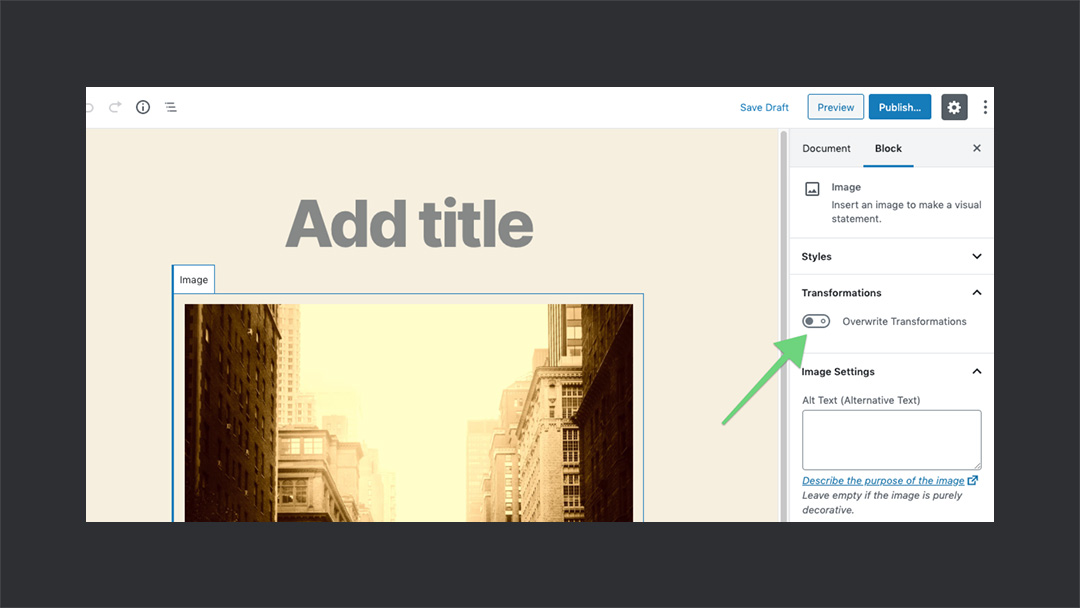
Once you have transformed the image and imported it in your content, a few new options will appear. Select the image, and you will see an option of Transformations on the right sidebar. You can use it to overwrite the transformations.
Remember that the individual level transformation has the highest priority. If you overwrite at this level, no taxonomy or global level transformations will be applied.
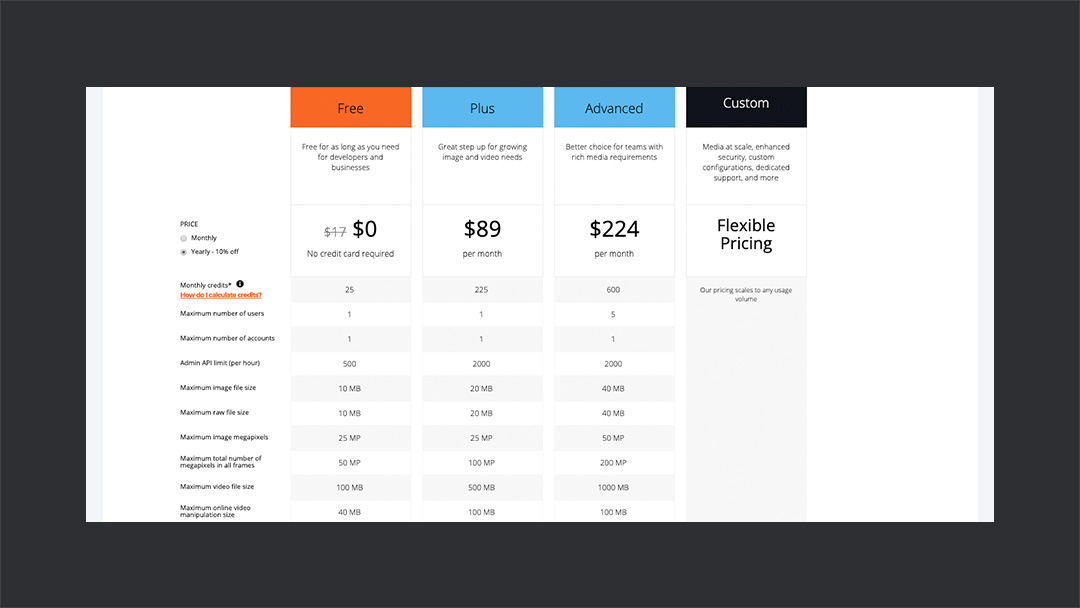
💰 Pricing
Cloudinary has a number of packages ranging from Free tier ($0) to Advanced ($224). Each comes with varying no. credits, users, and maximum size limits. A credit is translated to 1000 transformations or 1GB managed storage or 1GB net viewing bandwidth or 500 video processing seconds.
You can take a look at their pricing page for complete details. Cloudinary also offers custom packages according to your needs. So, if you need more than what is offered in the packages, you can contact the team for a custom package.
📖 Documentation
I have already mentioned Cloudinary documentation a couple of times in the article. They have detailed documentation with almost all the details that you’ll need to get started with it. I have linked the image and video transformation docs links before.
They also have dedicated documentation for the Cloudinary WordPress plugin. You can find it here, in case if you need any information. In opinion, if you go through the documentation, you won’t need any other resources to manage this plugin. So, thumbs up for Cloudinary. 👍
Wrap Up!
Cloudinary is a big name in the industry. Their WordPress plugin is one of their many solutions for various platforms. It works super fine with both classic and the Gutenberg editor. The best part is, they keep updating their products to compete at the cutting edge.
Cloudinary rocks great documentation, big names in the client list, and a product that you can rely on. I have used it for my personal projects and recommended it to many fellow developers. And I always got positive feedback from them.
👉 While Cloudinary is best at what it does, I have a few suggestions for their WordPress plugin. For example, the Dashboard of the plugin does technically nothing. Also, the Connect page is there just to connect with the Cloudinary account. Maybe they can be merged or aligned in a better way.
⚠️ One big issue with Cloudinary for WordPress plugin is the vendor lock-in. If you go over the free package, Cloudinary sends you a couple of emails to upgrade, and if you don’t upgrade — then instead of disabling the plugin, Cloudinary basically stops your site from working. I just found out about this and I think this is the worst vendor lock-in I have seen in a while. I’ve asked the company to re-think this and until they do, here’s a disclaimer to use this plugin with caution and remove the plugin if you plan to use more than it offers for free.
In my case, it uploaded gif images and processed its frames separately where less than 40 posts (total 838 source media files) led to 35,000 transformations which was a bit odd. That led to the upgrade notices (which didn’t land in the priority inbox not sure why). Then my site was disabled. Wasn’t even able to log in to the admin area. I had to go access my server, delete the Cloudinary plugin to make sure my site is up and running.
Also, what solutions do you use for media optimization or transformations? Have you ever used Cloudinary? What are your thoughts on it? Let us know in the comments section below!
Peace! 🤞
TheDevCouple

AHMAD AWAIS
Developer edutainer: NodeCLI.com · VSCode.pro
Ahmad Awais is an award-winning open-source engineer, Head of Developer Relations at RapidAPI, Google Developers Expert Dev Advocate, Node.js Community Committee Outreach Lead, WordPress Core Dev, and ex VP of Engineering at WGA. He has authored various open-source software tools used by millions of developers worldwide, like his Shades of Purple code-theme or projects like the corona-cli.
Say Hi to him on Twitter — @MrAhmadAwais.

MAEDAH BATOOL
Developer Content Manager: Writy.io
Maedah Batool is an official WordPress Marketing Team Representative, a WordPress Core Contributor, Technical Content Manager and Director of Developer Content at WGA. She created a tech-training startup called FinkTanks where she has taught 7,500+ girls how to code with WordPress, Next.js, React, and more. After FinkTanks was acquired she took a role in DevRel as a Technical Content Manager.
Say Hi to her on Twitter — @MaedahBatool.
🙌
SUBSCRIBE TO DEVELOPERS TAKEAWAY!
A Premium Development Newsletter by TheDevCouple! What is TheDevTakeaway?
IPStack #1 Choice for Site Visitors’ Tracking and Identification
Read Article
DevKinsta – One Suite For All Your WordPress Development
Read Article
Hi there. I am new qith this topic. Do I understand that correctly: After I have synced the media to Cloudinary, all the media are served from the Cloudinary CDN, right?
So, can or should I then deled my mediaLibrary in WordPress? Or can I? – I have a lot of media files and the backup process is quite long.
Thanks and Cheers.
I think this is a question for [email protected] — I believe you can’t delete the media but you should reach out to them and ask just in case.