As a developer, we are always careful with sites. We want all the best tools and features for managing them. And if our hosting company is giving us services like free CDN, SSL for them, then it’s the cherry on top.
A good hosting company offers all the site management tools that you may need for handling your sites. These tools make site management easy and you can easily build secure and performant websites. Thereby improving your experience and saving your time. 💯
Kinsta has been my go-to WordPress managed to host option for years now. It’s performant, rocks a great support team, amazing documentation, and comes with a great set of site management tools. I have used most of the features of Kinsta and tools like daily backups and New Relic Monitoring are saving my time on a regular basis. That’s exactly why I decided to write a piece on them and share my experience. 🙌
Today, I will be talking about all the amazing site management tools which Kinsta offers to its customers. I will also be sharing my insight on how these tools can become incredibly useful. So, without any further delay, let’s jump right in!
🌐 Sites Section
The Sites section of your Kinsta dashboard is where all of your sites are listed. It comes with all the features and tools that you need to manage your sites. You can add a new site, manage the existing sites, and export the site’s list to a CSV file.
When you click on any site, you get access to all the site management tools that Kinsta has to offer. These tools can come in handy for security, migration, making major changes, backups, and whatnot. Over the years, I have used those tools so much that now I find it hard to manage sites without them. 🤞
Let’s take a quick look at the section of the sites first and then dive deep into those tools.
➕ Add Site
Adding a site is quite simple and straight forward. Just click on the Add Site button on the upper right corner and fill all the details. And you are good to go!
Remember that the number of sites that you can add is limited by your hosting plan.
📊 Export to CSV
Kinsta lets you convert your site’s list into a CSV file and download a copy of it. The CSV file contains comprehensive information on all your sites. This information includes your sites’ name, identifier, location, SSL certificate, SSL expiration, HTTPS, domains, IP, path, port, staging port, your sites’ current external IP and PHP version.
⚙️ Managing Sites
You can manage all of your sites from the site’s section of the Kinsta dashboard. It displays your websites in chronological order with information like location, bandwidth, PHP version, environment, and disk usage. Giving you all the necessary information at first glance.
By clicking on any of the sites, you will see a completely different control panel with many different options. You can then use these site management tools to configure your website.
📍 Domains
The Domains option in your dashboard allows you to manage your website domains. You add and manage multiple domains for your site. You can also select a Primary domain for your site.
Make sure when you add a new domain, you set up the DNS record accordingly. All the domains listed here will point to your site. So, if you want to point a new domain to your previous site before you set it up, this is the place. 💯
🎯 Backups
Backups are super important. If your site crashes unexpectedly or encountered an attack then you should have a backup to go back to. Otherwise, you probably have to start all over again.
Kinsta takes backups of all your sites on a daily basis. These backups are stored on Kinsta’s servers for a few weeks depending upon your hosting plan. If your plan ranges between $30 to $200, these backups will be available to you for 14 days. But if your plan is higher than $400, Kinsta will not delete your backups for 30 days.
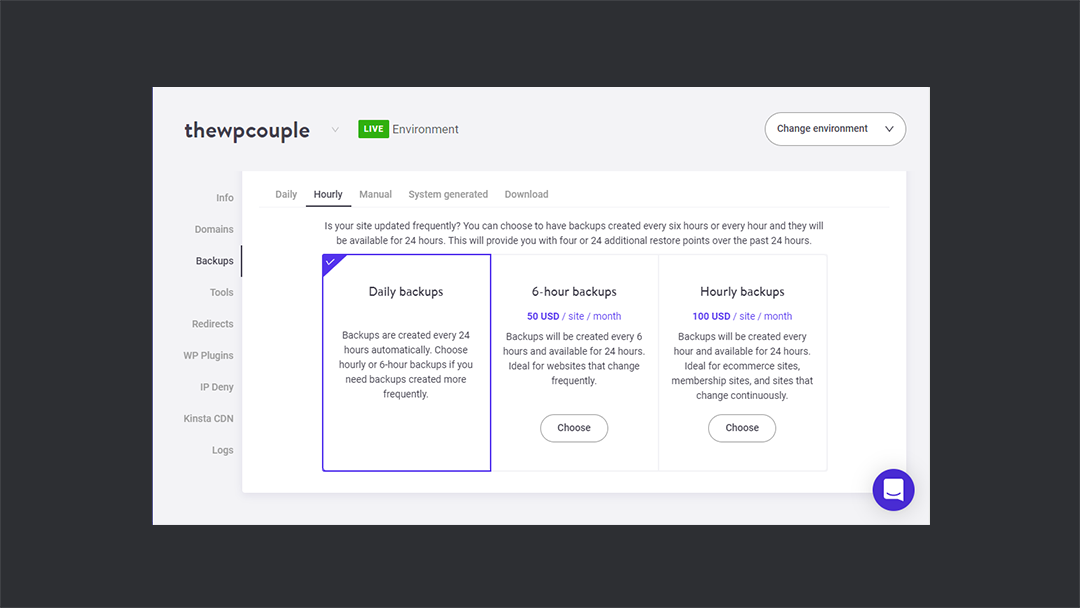
Kinsta has multiple backup options for its customers. These are daily, hourly, manual, system generated and downloaded. You can use these options to create backups at any time of the day. You can also generate offline backups of your sites, create hourly backups and much more.
🌟 Daily Backup
Kinsta uses this option on your site daily. You don’t have to do anything. The daily backups are generated automatically. You can then revert back to it by just clicking on the Restore To button.
⏱ Hourly Backup
Kinsta will backup your site every 6 hours if you pay them extra $50/month. If you want your sites to backup on an hourly basis, it will cost you $100 every month. Unlike daily backup, these backups will remain on Kinsta servers for 24 hours. After that, they will no longer be available.
⚡️ Manual Backup
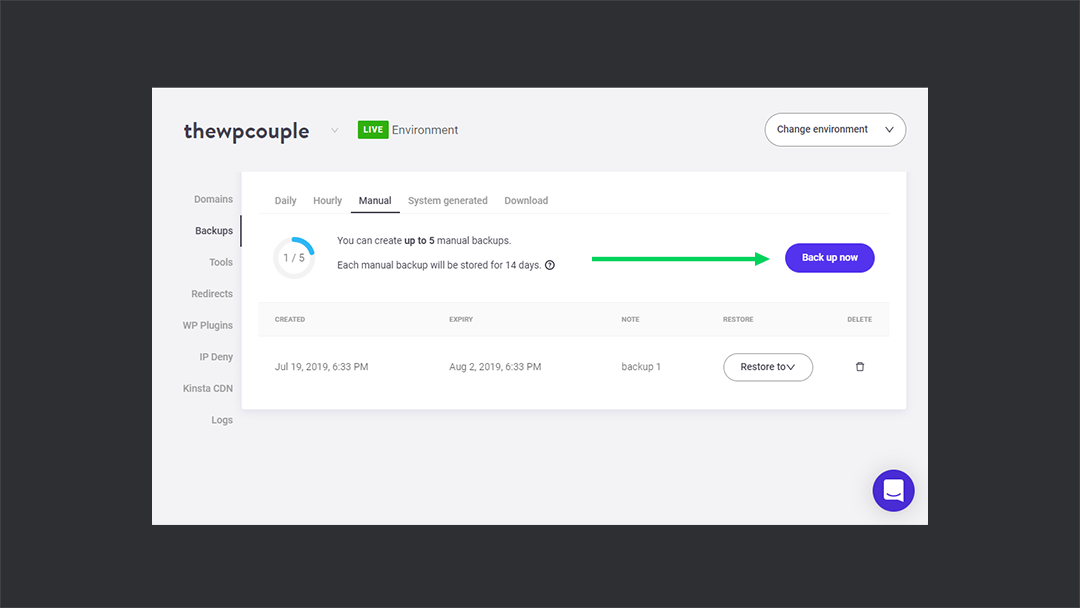
You can manually back up your websites anytime you want. Kinsta allows you to create 5 manual backups. What you need to do is hit on the Back up now button and give a short name to identify your backup later. It will only take a couple of minutes and your backup will be ready.
It’s a pretty handy tool to have during development. I always manually backup my sites before doing any kind of upgrade. If my site crashes, I can just revert back to the working version which is just great!
🤖 System Generated
Kinsta has placed a contingency plan in case something crashes your site while it is in development. It backups your sites automatically before you perform specific actions. These actions include pushing a staging environment to live, using the search-replace tool or restoring a backup to your live environment.
📇 Download Backup
If you wish to backup your entire site offline, Kinsta has you covered there too. The downloadable backups of Kinsta let you create a downloadable archive file containing your entire website. You can create this offline backup once a week. Once the backup is created, you have 24 hours to download it before it gets deleted.
Manual backups can help big time for backing up your site before you introduce a new feature. Daily and hourly backups automatically generate backups for all of your sites. Options like system generated, download is a great resource for developers like me who constantly make changes to their projects. Thus, having so many different backup options give you more complete control of your website.
🗑 Clearing Your Site’s Cache
Kinsta offers an amazing site management tool that lets you clear your site’s cache right from the dashboard. It’s called Clear Site Cache. You can find it in the Tools section of your site’s control panel.
The sizable amount of cache hampers your site’s speed. It also affects its optimization. By using Clear Site Cache, you can delete this cache easily. So, it is a great tool when it comes to improving your website’s overall performance.
♾ Restart PHP
Sometimes your site faces unexpected connectivity troubles or it becomes slow. Restarting your PHP Engine may help to clear out some issues of your website. You can do it using the Restart PHP tool offered by Kinsta. This tool is also super helpful when you are facing the 502 error.
🎯 New Relic Monitoring
New Relic APM is an amazing diagnostic service for sites. It checks your site for possible errors and reports it back to you on its dashboard. This way, it ensures that your site’s not facing any serious performance issues.
Kinsta’s New Relic Monitoring tool lets you use the amazing services offered by New Relic APM. It allows you to add your own New Relic license. You can then check the detailed performance stats of your website in your New Relic dashboard.
🧾 SSL Certificate
You get a free SSL certificate every time you buy a Kinsta hosting plan. You can enable this certificate in the Tools section of your site’s control panel. Just click on Enable HTTPS and select Generate free SSL Certificate from the drop-down menu.
SSL certificates are extremely useful for your site’s security. When you send your data over an HTTPS protocol, it gets encrypted. This encryption is done via an SSL certificate. So, if your data is intercepted before it reaches the destination, it will not bring you any harm.
As a web developer, I know how important the SSL certificate is for a website. Therefore, I immediately applied for it on all of my sites as soon as I migrated to Kinsta. And ever since then, I have never faced any kind of security problems related to the HTTPS protocol.
🐘 PHP Engine
PHP engine lets you switch between different versions of PHP. It only takes a few minutes to shift to any version. The available PHP versions are v7.2, v7.3 and v7.4. Kinsta recommends using v7.4 as it is much faster than its predecessors.
Imagine how simple Kinsta makes it for you to change the PHP engine by merely selecting a version from dropdown. I mean, it just can’t get better than this. And saves tons of time. 💯
🐛 WordPress Debugging
By default, WordPress debugging is turned off. You have to manually turn it on by setting the debugging variable. It’s super helpful during WordPress development.
Kinsta understands this. That’s why they have built this feature that allows you to turn on/off debugging through just one click. All you need to do is to click on the site name in your Sites section, go to Tools, and click on Enable button under WordPress Debugging. That’s all.
You can see in the screenshot below where I have shown two screens to demonstrate it. On one side, it’s showing that I have enabled this feature, on the other hand, it’s showing an error on the frontend because I have enabled it. 🤞
🔍 Search and Replace
🔗 Redirects
This section is used to set the redirect rules for your sites. They are particularly useful for preventing 404 errors, ensuring proper SEO when you make changes. It also routes visitors to the correct location of your site.
Redirect rules are interpreted as regular expressions. These rules can produce unexpected results if the effects of regular expressions are not properly considered. You can learn more about these regular expressions in Kinsta’s Knowledgebase article on redirect rules.
🔴 IP Deny
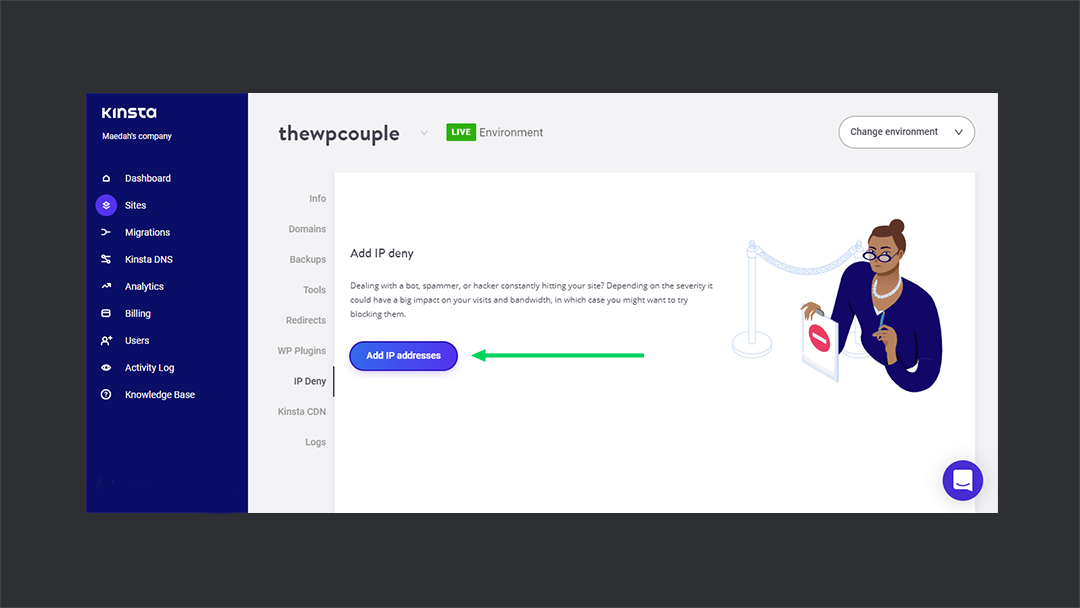
You can see who is visiting your site the most under the Geo Analysis section of Analytics in the Kinsta dashboard. This is good information as it can help you to figure out the IP that is suddenly consuming your site’s resources. You can then block this IP address using the Kinsta IP Deny tool.
The IP Deny tool is used to block IPs from accessing your site. If a blocked IP visits your site, it will just get a 403 error. You can use the Add IP addresses button to add the IPs to the list.

🙌 Final Words
I have always been a fan of the Kinsta team. They have set a bar in Managed WordPress Hosting world. The best part about them is that they are constantly improving. They focus on small details and make it better every day.
Since my first usage of Kinsta, it has completely revamped. The brand new dashboard, super detailed and helpful analytics, CDN, DNS, and one-click everything. They focus on the pain points of the WordPress developers and build useful solutions out of it.
For example, WordPress Debugging and Search and Replace is something that we can all relate to and struggled with as a WordPress developer. Now, imagine removing all that struggle and doing everything through just one click.
The site management tools at Kinsta are my go-to option for pretty much everything I want to do with my sites. I rely on Kinsta to do all the hard work while I can relax and focus on my work. 😌
Which hosting service do you use? What site management tools do they have to offer? Have you ever used Kinsta? What do you think of its tools? Let us know your thoughts in the comments section below.
Peace! ✌️
🙌
SUBSCRIBE TO DEVELOPERS TAKEAWAY!
A Premium Development Newsletter by TheDevCouple! What is TheDevTakeaway?


